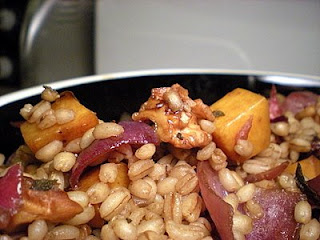
Balsamic, Butternut, and Barley Salad

Sad times lend themselves to warm comfort food, fuzzy blankets, friends, and movies. Regrettably, however, they do not lend themselves to successful blog posting, and I have certainly had some very sad times lately. Even so, it seems that I have finally returned from the land of self-pity enough to update my much neglected blog.

Since my cooking has largely turned towards simple comfort food the past few days I've decided to post an old favorite that I have successfully served to many of my friends on a variety of occasions. It is the perfect blend of sweet, savory, nutty, and acidic to please almost anyone. The one drawback...it takes about a half hour to an hour of constant watching and tending and messing with three different things simultaneously (which, if you're me, is nearly impossible). Even so, the end result is well worth it and (an added bonus) this is the type of recipe that can be served hot (as a side grain) or cold (as more of a grain salad) and tastes even better after it's sat in the fridge overnight. It also makes a generous amount and so if you want, you could potentially live off of it for the better portion of a week. And so, without further ado, I bring you...


Barley Salad with Toasted Walnuts, Roasted Winter Squash and Red Onions, in a Balsamic Reduction Sauce.

2 cups pearled barley
2 teaspoons salt
5 cups water
3 cups butternut squash, cut into 1/2-inch dice
1 large red onion cut into 8 chunks and pulled apart a bit
1 tablespoon fresh sage minced
1 1/2 tablespoons olive oil
1 tablespoon balsamic vinegar
1 cup toasted walnuts
1 cup balsamic vinegar
2 tablespoon agave syrup (or 3 tablespoons sugar if you don't have agave)
2 tablespoons sage roughly chopped

Preheat the oven to 375 F. Bring the water and salt to a boil. Add the barley and cook 25 to 30 minutes until done but still a bit chewy (you want the barley to have a bit of structure). After 20 minutes, taste the barley, and continue to do so every 5 minutes until it is done. Meanwhile, combine the squash, onions, olive oil, 1 tablespoon sage, and 1 tablespoon balsamic vinegar in a rimmed baking sheet. Bake in the preheated oven for 20 to 30 minutes, stirring every 5 minutes. While the barley and squash/onions cook begin the balsamic reduction sauce. Combine the 1 cup balsamic vinegar, agave nectar (or sugar), and 2 tablespoons sage in a small saucepan over medium/low heat. Cook, stirring often, until the mixture is reduced by half and has the consistency of maple syrup. Be careful not to reduce by too much or it will become bitter, also, watch out for balsamic fumes as it is cooking, they are quite acrid. After all the components are completed, place the squash mixture, barley, and walnuts in a large bowl and toss to combine. Pour the balsamic sauce over the mixture and toss once more to mix thoroughly. Serve warm or move to the refrigerator and serve cold.
serves 6 to 8 (with pretty generous portions)

M&M Cookies and a new family member

The past few days have been more than a little hectic. It's been a good sort of hectic for the most part however, just not the sort that lends itself to blog posting. On December 31st, I adopted a puppy from the local humane society. She is a two month old Rottweiler mix named Carly (like the children's book "Good Dog Carl" but feminized) and an adorable ball of nonstop puppy energy (as I write this she's attempting to gnaw on the corner of my laptop). Needless to say, the past few days have been spent wrestling, potty training, petting, and attempting to keep Carly from devouring my entire house rather than cooking. Even though this is a food blog, I can't resist showing her off and posting just a few pictures. They're a bit blurry since she is almost always in motion but, they're what I've got for now.


Here Carly is sitting in my friend Rose's lap gnawing on a stuffed bear that is by now pretty gross looking

And now for the cookies. I made these a few days ago for my brother who is down in the Sacramento area playing in a high school basketball tournament (send him good vibes for me please). Although he was happy to be playing basketball, he was not so thrilled about spending half of his Christmas break away from home. In order to cheer him up, I baked a big batch of m&m cookies for him to take along with him (and of course I saved a few for myself).


I used the Nieman Marcus chocolate chip cookie recipe (leaving out the instant coffee) and used m&m's rather than chocolate chips. I also made the cookies quite a bit smaller than called for in the recipe which decreased the baking time by a bit. Since the recipe is so good, and I did make a few adjustments, I'm posting it here for your baking pleasure. Hope you enjoy it as much as I do.


Chocolate Chip Cookies

(adapted from the Neiman Marcus recipe found here)

1/2 cup (1 stick) butter, softened

1 cup brown sugar (light for a milder flavor or dark, as I prefer, for a stronger hint of molasses)

3 tablespoons raw sugar (alternately you could use regular granulated sugar)

1 large egg

2 teaspoons vanilla extract

1 3/4 cups White Whole Wheat or Whole Wheat pastry flour (alternately you could use all purpose)

1/2 teaspoon baking powder

1/2 teaspoon baking soda

1/2 teaspoon salt

1 1/2 cups chocolate chips OR m&m's

Preheat oven to 300 F.

Cream the butter with the sugars using an electric mixer on medium speed until fluffy and light in color (approximately 30 seconds). Beat in the egg and the vanilla extract.

In a mixing bowl, sift together the dry ingredients and beat into the butter mixture at low speed until fully combined. fold in the chocolate chips/m&m's.

Using a tablespoon measure, drop cookie dough onto a cookie sheet lined with parchment paper about 3 inches apart. Bake for about 12 0r 15 minutes or until lightly browned around the edges. Bake a little longer for a crispier cookie. Makes approximately 3 1/2 to 4 dozen cookies.


Gingerbread Men (Better late than never)

Every Christmas my family whips up a batch or two of gingerbread cookies and then sits down around the table to decorate them in all manner of crazy ways. Now, I have always loved the decorating part, it is one of my favorite Holiday traditions, but I have never been such a fan of actually eating the gingerbread. To me, gingerbread has always tasted like spicy cardboard. I've always though of them as chewy, bland, just barely salvaged by the generous amount of icing smeared across them. This year, however, I discovered a recipe that completely changed my preconceptions of gingerbread. These cookies had all the punch of flavor of a gingersnap but were still mild enough so that the addition of decorations did not make them overwhelming. In addition, the cookies were strong enough to support gobs of sprinkles and icing and candies without having the consistency of a wood.

Gingerbread Men (adapted from the Fannie Farmer Cookbook)

1/2 cup molasses
1/4 cup sugar (I used raw cane sugar)
3 tablespoons butter
1 tablespoon milk
2 cups flour
1/2 teaspoon baking soda
1/2 teaspoon salt
1 teaspoon ginger
1/2 teaspoon cinnamon
1/4 teaspoon cloves
generous grate of fresh nutmeg
pinch black pepper

Preheat the oven to 350 F. Line baking sheets with parchment paper. In a large bowl, combine the butter, milk, and sugar. In a small saucepan heat the molasses to the boiling point, pour over the sugar/butter/milk mixture and stir until the butter is completely melted. In a separate bowl whisk together the flour, spices, salt, and baking soda. Combine the dry mixture with the wet mixture If needed, add a bit of water to the dough so that the dough sticks together and handles easily. Roll the dough into a 1/4 inch thick sheet and cut out shapes using cookie cutters. Bake 5 to 7 minutes . Allow to cool completely and then have fun decorating.

Happy Holidays

Just wishing everyone a happy holidays. Sorry I haven't been posting recently, it's been a whirlwind of food, friends and family ever since I got home from Berkeley. I have been racking up the recipes however, so I'll be back with a couple posts tomorrow.

Pesto quinoa stuffed squash


I am finally home for the holidays. It's my first real break since summer (Thanksgiving is only a two day break, so it doesn't really count) and I am attempting to soak up all of the comforts of home that I can before I head back to Berkeley (not for another three weeks thankfully). Since I've gotten here I have been baking non-stop. A few failures (who new Macaroons could be so complicated), a few recipes that need tweaking before I write about them (some marvelous corn lime cookies, almost perfect, just need to nail the texture), and some marvelous MARVELOUS gingerbread men. Of course, since I've been doing all this baking, something had to go wrong. I have conveniently lost the cable that connects my camera to my computer. I'm feeling like the most scatter-brained person ever.

Because of my remarkable ability to lose things right when I need them, I've decided to post an older recipe. This is a marvelously simple and impressive quick and delicious dinner recipe. I used to make this all the time in my co-op because it takes all of about forty minutes start to finish. This recipe looks complicated, but trust me, it's not. Actually, it has the added bonus of not dirtying any dishes (provided you have the patience to wait for it to cool enough to pick the squash up without a plate, I never do)


Pesto Quinoa Stuffed Squash (serves 1)

1 small squash (my favorite is sweet dumpling)
1/4 cup quinoa
1/2 cup water
1/2 cup diced onion
1 clove garlic minced
2-3 Tablespoons pesto (I use this one from 101 cookbooks, and you really don't need to add the oil if you don't want to since the squash is pretty moist)
fresh basil for garnish

Preheat the oven to 350 F and spray a cooking sheet with cooking oil. Cut the squash in half and scrape out the innards. Place it cut side down and bake it 20 minutes or until soft. Meanwhile, bring the quinoa and water to boil in a small pot. Lower the heat and simmer for 10 to 15 minutes or until the water is absorbed and the quinoa is tender. While the quinoa and squash cook, saute the onion and garlic in a little olive oil until the onion is translucent. After the squash is done scrape, out the flesh into a bowl leaving enough in the squash to leave the skin intact. Mash up the squash with a fork and then stir in the quinoa, onion/garlic mixture, and pesto until fully combined. Pile this mixture back in the squash, put the squash back in the oven, and bake 20 more minutes. Garnish with fresh basil leaves if desired.

Maple pecan brown sugar cookies

Well, finals ended and is seems as though their absence only made way for more chaos. The chaos of moving. As soon as finals ended I was faced with the task of moving myself and all of my worldly belongings (ok, more like a quarter of my worldly belongings) from my co-op and into a shiny new apartment. The apartment is beautiful (albeit tiny), and I am so excited to be moving in. The only source of concern is the complete lack of counter space. "Complete lack" as in my only counter space is a mini rolling butcher-block cart from Ikea. That and a kitchen table. This is going to me a drastic change from the commercial sized kitchen I am used to in my Co-op. I'm hoping that the lack of mess (as in lack of 150 other students trooping through my kitchen at all times and leaving food EVERYWHERE) and the increase in personal space will more than make up for the downsize.

What's more, moving was absolutely exhausting, both physically and emotionally. My co-op room was on the third floor of what was once an old hotel meaning everything I was taking with me had to be carried down three flights of stairs. A futon, mini fridge, dresser, chair, and bookshelf. There were a lot of near tumbles, banged shins and swearing but my mom and I eventually managed to move everything out. The emotional part came as a bit of a surprise. For nearly the entire year I have been desperate to get out of my insane living situation but when it came down to it and I looked at the room I have lived in for the past year and a half completely emptied out, I was strangely sad. I guess I was more attached than I realized. Of course, the best way to deal with sad times for me is to bake.


And now I bring you my new favorite holiday cookie recipe. This is a creation all my own inspired by a bizarre craving for a cookie made with maple syrup and the arrival of a massive bag of pecans to my pantry. These cookies are everything I look for in a cookie. Sweet, a bit spicy, chewy, and with a variety of textures and flavors. Molasses-y from the brown sugar, earthy from the toasted nuts and warm and wintry from the spices, this is the perfect addition to any holiday cookie list.


Maple Pecan Brown Sugar Cookies

1 1/2 cups all-purpose flour
1/2 teaspoon baking soda
1/2 teaspoon cinnamon
1/4 teaspoon allspice
pinch cloves
generous grate fresh nutmeg
1/4 teaspoon salt
3/4 cup packed brown sugar
1/4 cup butter softened
2 tablespoons maple syrup
1 large egg
1/2 cup pecans toasted and chopped finely

1/2 cup raw sugar
1 tablespoon maple syrup

Preheat the oven to 350 F. In a medium bowl combine the dry ingredients (flour through salt). In a separate bowl beat butter and sugar until lightened. Add maple syrup and egg, beat until fully combined. Stir in the dry ingredients and then fold in the the chopped pecans. In a small bowl combine the raw sugar and 1 tablespoon of maple syrup. Mix until it has the consistency of brown sugar. Shape the dough into balls about the size of small walnuts and roll in the maple syrup/sugar mixture. Place the balls onto a parchment lined baking sheet and squash lightly. Bake approximately 10 minutes or until lightly browned around the edges
Makes about 3 dozen.

Back to Baking...Whole Wheat Challah (that actually tastes like challah)


I am finally done with school. On Tuesday I sat down and cranked out my last exam and now, I can officially take a break from everything school related for the next month. It is an immense feeling of relief. That said, I have been neglecting my blog for the past few days. In the mean time, I have been racking up the recipes to post about. There was a stuffed squash and some pretty marvelous cookies but I decided to post first about what I am most proud of...my very own recipe fro whole wheat challah, that actually tastes like challah. I love challah, sadly it is usually composed of white flour, something I've been trying to cut out of my diet lately (with mixed success). It's a strange thing that I have developed such a love for challah. Up until my freshman year of college, I had never even heard of the bread, now it is my favorite bread.

I was first inspired to make whole wheat challah by this post over at 101 cookbooks. Now I know that peter reinhart is very good with breads. I myself have had enormous success with most of his recipes that I've tried...this being the exception. Let me clarify, it was good bread, it made for delicious sandwiches and toast...but it was not challah. My biggest problem with it was that it was not light and fluffy, rather it was quite dry and crumbly. And,to add insult to injury, it was not remotely sweet Maybe I should give the recipe another shot, maybe it was something I did wrong (which is quite possible, especially in the realm of yeast breads). Now that I've found my recipe however, I doubt I ever will.


This recipe was adapted from another recipe (which I found at quite a few different sources) for regular old white flour challah. What I did was replace the white flour with a mixture of whole wheat flour and vital wheat gluten. Vital what? To be entirely honest I'm not all that clear as to what Vital wheat gluten (also sometimes called gluten flour and available at most bulk food stores) but I do know what it does. It increases the elasticity of wheat flour which helps to create a lighter, fluffier, and far less coarse loaf of bread. This bread was so successful I have made tow loaves in the past week (no I didn't eat all of it myself although I easily could have). In addition to being absolutely marvelous for simply tearing off hunks and snacking on, it also makes the best french toast I have ever eaten. I hope you enjoy it too (and don't worry, I'll get that pecan recipe to you soon).


Whole Wheat Challah

1 cup luke warm water (divided)
2 eggs
2 egg yolks
2 tablespoons neutral flavored oil
3 tablespoons honey
2 1/4 teaspoons active dry yeast
4 cups whole wheat flour
1/4 cup vital wheat gluten
1 teaspoon salt

2 egg whites
poppy seeds (optional)


Mix 1/4 cup of the warm water with the yeast and allow to sit for 5 minutes. In a separate bowl whisk together the eggs, egg yolks, honey, oil, and remaining 3/4 cup water. Whisk in the yeast, water mixture. Add 2 cups of the flour, 2 tablespoons of the vital wheat gluten and the salt. Mix thoroughly and allow to sit for 15 minutes. Add in one more cup of flour and one more tablespoon of vital wheat gluten. Transfer the dough to a flat surface and slowly knead in as much of the remaining flour ad vital wheat gluten as possible. Continue kneading for 10 minutes. Place the dough in a well oiled bowl, cover, and allow to rise until doubled in bulk, approximately 2 hours.

After it has risen, transfer the dough onto a flat surface. Cut the dough into three equal pieces and roll each of the pieces into logs of equal length (these are instructions for a three strand braid, I tried, and failed, to make a six strand braid) Connect the three pieces at the top and make a tight braid. Pinch the other end to seal the braid and tuck both pinched ends under the loaf. In a small bowl, whip the egg whites with a fork until a foam forms on top. Using just the foam brush the Challah bread till all the dough has some of the egg wash. Set the remaining egg wash aside because you will need to do this again before baking. Cover the braid with plastic wrap and allow to rise till double in bulk, approximately an hour and a half.

Preheat the oven to 400 degrees. After the dough has risen remove the plastic wrap and whisk the remaining egg wash again and brush the foam on the braid again. Sprinkle with poppy seeds and place into the pre heated oven for 20 minutes then rotate the bread and turn the heat down to 375F bake for another 15 to 20 minutes or until the loaf is deliciously browned. Cool on a wire rack. ( currently bake in a convection oven, so it was done after the first 20 minutes. I expect that this is the correct baking time for most sane ovens, although I would check and make sure after the first 20 minutes).
 

Copyright © 2009 The Quirky Kitchen All rights reserved.
Converted To Blogger Template by Anshul Theme By- WooThemes