Gingerbread Men (Better late than never)

Every Christmas my family whips up a batch or two of gingerbread cookies and then sits down around the table to decorate them in all manner of crazy ways. Now, I have always loved the decorating part, it is one of my favorite Holiday traditions, but I have never been such a fan of actually eating the gingerbread. To me, gingerbread has always tasted like spicy cardboard. I've always though of them as chewy, bland, just barely salvaged by the generous amount of icing smeared across them. This year, however, I discovered a recipe that completely changed my preconceptions of gingerbread. These cookies had all the punch of flavor of a gingersnap but were still mild enough so that the addition of decorations did not make them overwhelming. In addition, the cookies were strong enough to support gobs of sprinkles and icing and candies without having the consistency of a wood.

Gingerbread Men (adapted from the Fannie Farmer Cookbook)

1/2 cup molasses
1/4 cup sugar (I used raw cane sugar)
3 tablespoons butter
1 tablespoon milk
2 cups flour
1/2 teaspoon baking soda
1/2 teaspoon salt
1 teaspoon ginger
1/2 teaspoon cinnamon
1/4 teaspoon cloves
generous grate of fresh nutmeg
pinch black pepper

Preheat the oven to 350 F. Line baking sheets with parchment paper. In a large bowl, combine the butter, milk, and sugar. In a small saucepan heat the molasses to the boiling point, pour over the sugar/butter/milk mixture and stir until the butter is completely melted. In a separate bowl whisk together the flour, spices, salt, and baking soda. Combine the dry mixture with the wet mixture If needed, add a bit of water to the dough so that the dough sticks together and handles easily. Roll the dough into a 1/4 inch thick sheet and cut out shapes using cookie cutters. Bake 5 to 7 minutes . Allow to cool completely and then have fun decorating.

Happy Holidays

Just wishing everyone a happy holidays. Sorry I haven't been posting recently, it's been a whirlwind of food, friends and family ever since I got home from Berkeley. I have been racking up the recipes however, so I'll be back with a couple posts tomorrow.

Pesto quinoa stuffed squash


I am finally home for the holidays. It's my first real break since summer (Thanksgiving is only a two day break, so it doesn't really count) and I am attempting to soak up all of the comforts of home that I can before I head back to Berkeley (not for another three weeks thankfully). Since I've gotten here I have been baking non-stop. A few failures (who new Macaroons could be so complicated), a few recipes that need tweaking before I write about them (some marvelous corn lime cookies, almost perfect, just need to nail the texture), and some marvelous MARVELOUS gingerbread men. Of course, since I've been doing all this baking, something had to go wrong. I have conveniently lost the cable that connects my camera to my computer. I'm feeling like the most scatter-brained person ever.

Because of my remarkable ability to lose things right when I need them, I've decided to post an older recipe. This is a marvelously simple and impressive quick and delicious dinner recipe. I used to make this all the time in my co-op because it takes all of about forty minutes start to finish. This recipe looks complicated, but trust me, it's not. Actually, it has the added bonus of not dirtying any dishes (provided you have the patience to wait for it to cool enough to pick the squash up without a plate, I never do)


Pesto Quinoa Stuffed Squash (serves 1)

1 small squash (my favorite is sweet dumpling)
1/4 cup quinoa
1/2 cup water
1/2 cup diced onion
1 clove garlic minced
2-3 Tablespoons pesto (I use this one from 101 cookbooks, and you really don't need to add the oil if you don't want to since the squash is pretty moist)
fresh basil for garnish

Preheat the oven to 350 F and spray a cooking sheet with cooking oil. Cut the squash in half and scrape out the innards. Place it cut side down and bake it 20 minutes or until soft. Meanwhile, bring the quinoa and water to boil in a small pot. Lower the heat and simmer for 10 to 15 minutes or until the water is absorbed and the quinoa is tender. While the quinoa and squash cook, saute the onion and garlic in a little olive oil until the onion is translucent. After the squash is done scrape, out the flesh into a bowl leaving enough in the squash to leave the skin intact. Mash up the squash with a fork and then stir in the quinoa, onion/garlic mixture, and pesto until fully combined. Pile this mixture back in the squash, put the squash back in the oven, and bake 20 more minutes. Garnish with fresh basil leaves if desired.

Maple pecan brown sugar cookies

Well, finals ended and is seems as though their absence only made way for more chaos. The chaos of moving. As soon as finals ended I was faced with the task of moving myself and all of my worldly belongings (ok, more like a quarter of my worldly belongings) from my co-op and into a shiny new apartment. The apartment is beautiful (albeit tiny), and I am so excited to be moving in. The only source of concern is the complete lack of counter space. "Complete lack" as in my only counter space is a mini rolling butcher-block cart from Ikea. That and a kitchen table. This is going to me a drastic change from the commercial sized kitchen I am used to in my Co-op. I'm hoping that the lack of mess (as in lack of 150 other students trooping through my kitchen at all times and leaving food EVERYWHERE) and the increase in personal space will more than make up for the downsize.

What's more, moving was absolutely exhausting, both physically and emotionally. My co-op room was on the third floor of what was once an old hotel meaning everything I was taking with me had to be carried down three flights of stairs. A futon, mini fridge, dresser, chair, and bookshelf. There were a lot of near tumbles, banged shins and swearing but my mom and I eventually managed to move everything out. The emotional part came as a bit of a surprise. For nearly the entire year I have been desperate to get out of my insane living situation but when it came down to it and I looked at the room I have lived in for the past year and a half completely emptied out, I was strangely sad. I guess I was more attached than I realized. Of course, the best way to deal with sad times for me is to bake.


And now I bring you my new favorite holiday cookie recipe. This is a creation all my own inspired by a bizarre craving for a cookie made with maple syrup and the arrival of a massive bag of pecans to my pantry. These cookies are everything I look for in a cookie. Sweet, a bit spicy, chewy, and with a variety of textures and flavors. Molasses-y from the brown sugar, earthy from the toasted nuts and warm and wintry from the spices, this is the perfect addition to any holiday cookie list.


Maple Pecan Brown Sugar Cookies

1 1/2 cups all-purpose flour
1/2 teaspoon baking soda
1/2 teaspoon cinnamon
1/4 teaspoon allspice
pinch cloves
generous grate fresh nutmeg
1/4 teaspoon salt
3/4 cup packed brown sugar
1/4 cup butter softened
2 tablespoons maple syrup
1 large egg
1/2 cup pecans toasted and chopped finely

1/2 cup raw sugar
1 tablespoon maple syrup

Preheat the oven to 350 F. In a medium bowl combine the dry ingredients (flour through salt). In a separate bowl beat butter and sugar until lightened. Add maple syrup and egg, beat until fully combined. Stir in the dry ingredients and then fold in the the chopped pecans. In a small bowl combine the raw sugar and 1 tablespoon of maple syrup. Mix until it has the consistency of brown sugar. Shape the dough into balls about the size of small walnuts and roll in the maple syrup/sugar mixture. Place the balls onto a parchment lined baking sheet and squash lightly. Bake approximately 10 minutes or until lightly browned around the edges
Makes about 3 dozen.

Back to Baking...Whole Wheat Challah (that actually tastes like challah)


I am finally done with school. On Tuesday I sat down and cranked out my last exam and now, I can officially take a break from everything school related for the next month. It is an immense feeling of relief. That said, I have been neglecting my blog for the past few days. In the mean time, I have been racking up the recipes to post about. There was a stuffed squash and some pretty marvelous cookies but I decided to post first about what I am most proud of...my very own recipe fro whole wheat challah, that actually tastes like challah. I love challah, sadly it is usually composed of white flour, something I've been trying to cut out of my diet lately (with mixed success). It's a strange thing that I have developed such a love for challah. Up until my freshman year of college, I had never even heard of the bread, now it is my favorite bread.

I was first inspired to make whole wheat challah by this post over at 101 cookbooks. Now I know that peter reinhart is very good with breads. I myself have had enormous success with most of his recipes that I've tried...this being the exception. Let me clarify, it was good bread, it made for delicious sandwiches and toast...but it was not challah. My biggest problem with it was that it was not light and fluffy, rather it was quite dry and crumbly. And,to add insult to injury, it was not remotely sweet Maybe I should give the recipe another shot, maybe it was something I did wrong (which is quite possible, especially in the realm of yeast breads). Now that I've found my recipe however, I doubt I ever will.


This recipe was adapted from another recipe (which I found at quite a few different sources) for regular old white flour challah. What I did was replace the white flour with a mixture of whole wheat flour and vital wheat gluten. Vital what? To be entirely honest I'm not all that clear as to what Vital wheat gluten (also sometimes called gluten flour and available at most bulk food stores) but I do know what it does. It increases the elasticity of wheat flour which helps to create a lighter, fluffier, and far less coarse loaf of bread. This bread was so successful I have made tow loaves in the past week (no I didn't eat all of it myself although I easily could have). In addition to being absolutely marvelous for simply tearing off hunks and snacking on, it also makes the best french toast I have ever eaten. I hope you enjoy it too (and don't worry, I'll get that pecan recipe to you soon).


Whole Wheat Challah

1 cup luke warm water (divided)
2 eggs
2 egg yolks
2 tablespoons neutral flavored oil
3 tablespoons honey
2 1/4 teaspoons active dry yeast
4 cups whole wheat flour
1/4 cup vital wheat gluten
1 teaspoon salt

2 egg whites
poppy seeds (optional)


Mix 1/4 cup of the warm water with the yeast and allow to sit for 5 minutes. In a separate bowl whisk together the eggs, egg yolks, honey, oil, and remaining 3/4 cup water. Whisk in the yeast, water mixture. Add 2 cups of the flour, 2 tablespoons of the vital wheat gluten and the salt. Mix thoroughly and allow to sit for 15 minutes. Add in one more cup of flour and one more tablespoon of vital wheat gluten. Transfer the dough to a flat surface and slowly knead in as much of the remaining flour ad vital wheat gluten as possible. Continue kneading for 10 minutes. Place the dough in a well oiled bowl, cover, and allow to rise until doubled in bulk, approximately 2 hours.

After it has risen, transfer the dough onto a flat surface. Cut the dough into three equal pieces and roll each of the pieces into logs of equal length (these are instructions for a three strand braid, I tried, and failed, to make a six strand braid) Connect the three pieces at the top and make a tight braid. Pinch the other end to seal the braid and tuck both pinched ends under the loaf. In a small bowl, whip the egg whites with a fork until a foam forms on top. Using just the foam brush the Challah bread till all the dough has some of the egg wash. Set the remaining egg wash aside because you will need to do this again before baking. Cover the braid with plastic wrap and allow to rise till double in bulk, approximately an hour and a half.

Preheat the oven to 400 degrees. After the dough has risen remove the plastic wrap and whisk the remaining egg wash again and brush the foam on the braid again. Sprinkle with poppy seeds and place into the pre heated oven for 20 minutes then rotate the bread and turn the heat down to 375F bake for another 15 to 20 minutes or until the loaf is deliciously browned. Cool on a wire rack. ( currently bake in a convection oven, so it was done after the first 20 minutes. I expect that this is the correct baking time for most sane ovens, although I would check and make sure after the first 20 minutes).

Thai Curry Lentil Stew (see, I do more than just bake)


Looking through my blog posts I realized that almost everything I've posted so far has been baked goods (everything but one, measly soup recipe without a picture because I hand lost my camera). This is in part because I absolutely love baking. Oh, whipping up dinner can be fun too but there is nothing quite like the feel of soft dough between my fingers, or the smell of bread in the oven, or the taste of a chocolate chip cookie eaten off of a hot baking sheet. Even so, this doesn't mean that I don't cook. On the contrary, I cook myself dinner just about every night. The reason I haven't posted anything about it however is that, to be honest, my dinners are usually pretty boring. When I go home for breaks I'll often experiment with more complicated recipes but here in Berkeley, in my massive, out of control kitchen, on a school night, dinner has just three specifications that it has to meet.

a. It has to be healthy
b. It has to taste good
c. It has to come together with no more that 1 hour spent in the kitchen, total, that includes chopping, peeling, slicing, dicing and anything else I might have to do for prep.

Usually dinner ends up being a one pot meal, full of flavor and utterly lacking in eye appeal or method of preparation. Now, a very common one-pot meal for me is lentil soup (my staple recipe is Heidi Swanson's over 101 cookbooks). It's a nutritional powerhouse. You can mix any number of things into it, put any number of toppings on top of it, and spice it up any way you like. Best of all, it usually comes together in all of 20 minutes and it's a pretty hard dish to ruin. The flip side to that is, it's also a pretty hard dish to make exciting.

That is until (drum roll please)... I discovered this recipe. This was lentil soup as I'd never seen it before and to be entirely honest, I was a bit suspicious. The ingredients didn't quite seem as though they'd go together all that well. But the author's praise was so enthusiastic and the pictures so warm and delicious looking on this very cold day that, despite my doubts, I decided to try it out, with some alterations of course. I am very glad I did. This is my ideal one pot meal. Spicy from the jalapeno and curry paste, sweet from the sweet potato, sour from the lime, and earthy from the lentils. I adapted my creation quite a bit from the original recipe and so I'm presenting my version here.


Thai Curry Lentil Stew

oil for sauteing
3 large cloves garlic
1 yellow onion-minced
1 1/2 tablespoons Thai red curry paste
1 teaspoon fresh ginger, grated
1 fresh jalapeno finely chopped (seeds left in if you like spice, or if you're weird like me, de-seed half of it)
1/2 teaspoon salt
1 cup dried lentils (I used french lentils and would recommend you do to as they cook quickly and maintain their shape)
2 sweet potatoes, peeled and cut into 1 inch dice
1 14.5 oz can diced tomatoes (juice included)
2 cups water
1/2 cup minced cilantro (you can use parsley if you absolutely hate cilantro, or you can just leave it out entirely)
juice from 1/2 of a lime
yogurt, additional lime, and/or cilantro sprigs for topping (optional)

Heat a large pot on medium heat. Saute the garlic, onion, curry paste, ginger, jalapeno and salt until onions become translucent. Add lentils, sweet potatoes, tomatoes and water. Cover and simmer over medium head 20 to 30 minutes or until the lentils are tender and the sweet potatoes are soft. Remove from heat and stir in cilantro and lime juice. Serve with additional lime juice, cilantro, and yogurt as desired.

Cranberry Orange Almond Spice Bread


It's well into finals week for me here. I am now, finally, past the half way mark...3 down 2 to go. It's amazing how exhausting, and mentally draining, sitting for hours on end can become. Especially when you're running on four to five hours of sleep per night. The only consolation is, at the end of this I get to go home for a nice long break and not think about anything remotely scholarly for over a month.

The biggest problem for me while I'm studying is staying motivated. It's hard to think about the same thing for hours on end without getting distracted. My solution to this problem? I reward myself. Study for x amount of time and then you have y amount of time to do whatever you want. It seems to work...sometimes. Of course then there are the times when I decide that I'm going to reward myself by cooking up something scrumptious. Of course, this means that I have to spend a few hours figuring out what that something scrumptious is going to be. The point of all this is that, my something scrumptious yesterday was this marvelous quickbread.

For some reason, this summer I got the urge to bake with fresh cranberries. I know, weird. The was, however, that no matter how hard I looked, I could not for the life of me find fresh cranberries anywhere (ok, I found one bag of frozen cranberries for fifteen dollars but decided that it wasn't worth it). Apparently I am the only one who wants cranberries in the middle of summer. Since I couldn't make my recipes then, I had no choice but to shelve them until cranberry season arrived.

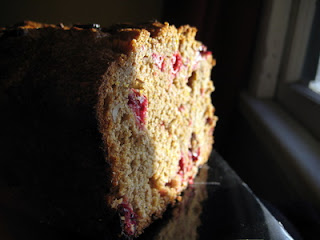
The recipe for this bread was inspired by the recipe on the back of the Ocean Spray bag of cranberries. Of course I tweaked it around a bit. Rather than simply "Orange-Cranberry bread" I made Orange Cranberry Spice bread. Also, rather than use walnuts (as suggested) I opted for the more distinctive flavor of toasted almonds (so really it's orange-cranberry-almond-spice bread). Finally, in regards to the sugar, I added 3/4 cup directly into the batter while the remaining 1/4 cup I tossed with the diced cranberries and added in at the end. The result was all that is quintessentially fall and the holiday season baked into one amazingly delicious loaf. This bread is so good, it is almost beyond words. It has a sweet, spicy, citrus-y flavor punctuated throughout with the sour bite of cranberries and the earthy crunch of toasted almonds. Tossing the cranberries with the sugar before hand took the edge off of their sourness without masking it completely. The almonds added a certain sweetness that would otherwise be absent and the spices added delicious warmth. My favorite new recipe of the holiday season thus far.


Cranberry Orange Almond Spice Bread

2 cups whole wheat flour
1 cup raw sugar (divided)
1 1/2 teaspoons baking powder
1 teaspoon salt
1/2 teaspoon baking soda
1 teaspoon cinnamon
1/4 teaspoon cloves
1/4 teaspoon allspice
generous grate of fresh nutmeg
3/4 cup fresh squeezed orange juice
1 tablespoon grated orange peel
2 tablespoons canola oil
1 egg
1 1/2 cups fresh cranberries, coarsely chopped
1/2 cup almonds, toasted and chopped

Preheat the oven to 350 F. Spray a 9x5 inch loaf pan with cooking spray. Coarsely chop 1 1/2 cup fresh cranberries and toss them with 1/4 cup of the sugar. Allow them to sit while you prepare the rest of the batter. Mix together flour, remaining 3/4 cup sugar, baking powder, salt, baking soda, cinnamon, cloves, allspice, and nutmeg. Make a well in the center of the flour and add in orange juice, orange peel, oil, and egg. Gradually stir in the flour mixture until well blended. Fold in the cranberries with remaining sugar and almonds Spread the batter evenly into the loaf pan (the batter will be more dough-like, don't worry, it's supposed to be that way).
Bake 45 minutes to an hour or until a toothpick inserted into the center comes out clean. Remove from pan, cool completely.
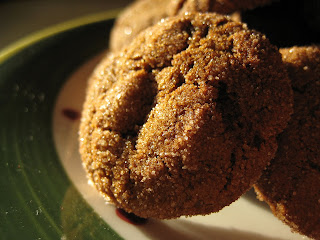
Pumpkin Cookies


I've been on a bit of a cookie bender as of late. The reasons for this are threefold

a. It's finals week therefore I will take any excuse to procrastinate, and any opportunity to de-stress a bit, that I can (and obviously I need study food)

b. (Also tied to finals week) Cookies are relatively quick and easy to throw together, and while I will take any excuse to procrastinate, I really can't be spending hours in the kitchen right now.

c. (Possibly the most important factor) It's the holiday season, and I have caught the baking bug.

The recipe I have today comes from one of my favorite food blogs (Joy the Baker and if you haven't checked her site out before, you really should). Now I know it's no longer Thanksgiving, but I was in the mood for something slightly less festive and more homey. These particular cookies are more like muffin tops than cookies, but that doesn't stop them from being absolutely delicious. They are moist and tender with a light crumb. The only changes I made to Joy's recipe were to replace half the oil with applesauce (and this was mostly because I like the sweet hint of apply flavor along with the pumpkin), substitute whole wheat flour for all-purpose and use raw sugar rather than white. I also made the cookies more...cookie sized, meaning I used a tablespoon measure rather than a 1/4 cup which decreased the baking time to about 10 minutes.


Pumpkin Chocolate Chip Cookies

Adapted from this recipe from Joy the Baker

2 cups whole wheat flour

1 1/2 teaspoons baking powder

1 teaspoon soda

1/2 teaspoon salt

1 teaspoon ground cinnamon

1/4 teaspoon freshly grated nutmeg

1/4 teaspoon ground cloves

2 eggs

1 cup raw sugar

1/4 cup canola or corn oil

1/4 cup applesauce

1 cup canned pumpkin

1 teaspoon vanilla extract

1 cup chocolate chips, or any chip you like

Position a rack in the middle of the oven . Preheat the oven to 325 degrees F. Line two baking sheets with parchment paper.

Stir the flour, baking powder, baking soda, salt and spices together in a medium bowl and set aside. In a large bowl, using an electric mixer on medium speed, beat the eggs and sugar until smooth and light colored. On low speed, mix the oil, applesauce, pumpkin, and vanilla until blended. Mix in the flour mixture to incorporate it. Mix in the chips.

Drop heaping tablespoons of the dough onto the cookie sheet spacing them about 2 inches apart.

Bake the cookies one sheet at a time until the tops feel firm and a toothpick inserted in the center comes out dry, about 10 minutes. Cool them on the baking sheet for 5 minutes, then use a wide metal spatula to transfer the cookies to a wire rack. Makes about 3 1/2 dozen

Bite Sized Chewy Molasses Ginger Cookies


By way of apology for my extended absence I've decided to post a little more often than usual this week. Of course, my desire to write blog posts is also heightened by the fact that it is finals week here at UC Berkeley meaning I have 3 finals and 2 papers in the next few days...so of course I'm looking for any way to procrastinate. This means that I spend way too much of my time in the kitchen (cooking is stress relief...right?) or on the internet looking at recipes (and the 5 minute break turns into an hour...or two).

Let me begin by saying that molasses cookies are my absolute favorite cookie. Back home in Humboldt I one of my favorite treats are the giant, chewy, intensely molasses cookies that you can get at the local bagel shop (called Los Bagels, in case you're ever in Humboldt). Since moving to Berkeley (and away from my beloved cookies), I have been questing for a recipe that will hold me over until the next break. This is that recipe.

Although these cookies are different from the giant ones back home, they have the same spirit, the same molasses-y, spicy, chewy goodness. They are bite sized, snacking, oops I think I just ate ten sort of cookies.

These cookies also have the added bonus of being absolutely adorable (thus perfect for any holiday cookie platters or gift baskets). In addition, they also keep well for days (if they last that long). My recipe is slightly adapted from this one from Better Homes and Gardens (if you look at their picture, don't ask me what the white things are on their cookies, I have absolutely no idea).


Bite Sized Molasses Ginger Cookies

1/3 cup unsalted butter
2/3 cup packed brown sugar
1 egg
1/4 cup molasses (I do a big sloshy "oops I accidentally spilled a bit extra into the batter" measurement)
2 cups whole wheat flour (alternately all-purpose would work)
1 teaspoon baking soda
1 teaspoon ginger
1/2 teaspoon cinnamon
1/4 teaspoon cloves
pinch black pepper
1/2 teaspoon salt
2 tablespoons granulated sugar
1/2 teaspoon cinnamon

Preheat oven to 350 degree F and line a cookie sheet with parchment paper; set aside.
In a large mixing bowl beat the butter with an electric mixer on medium to high speed for 30 seconds. Add the brown sugar, beat until combined. Beat in egg and molasses. Stir in the flour, baking soda, salt and spices.
Shape dough into 1-inch balls. Combine the granulated sugar and remaining 1/2 teaspoon cinnamon. Roll balls in sugar-cinnamon mixture. Place 2 inches apart on prepared cookie sheet and squash slightly with your fingers. Bake for 10 to 11 minutes or until set and tops are cracked. Remove from cookie sheet. Cool on a wire rack. Makes about 4 dozen

Super Fudgy Dark Chocolate Cookies and the Computer Haitus is Over!

First off, I have a brand new computer. It is perfectly shiny and wonderful although I am having a bit of trouble figuring out how to work this and that but still, all in all, I'm pretty pleased and Oliver is extremely relieved that I will now stop stealing his computer.

As an apology for my long absence I give you the best cookies I have eaten in years. It was all I could do to restrain myself from eating all 2 1/2 dozen. They are that good. These cookies are essentially a brownie baked into cookie form and they practically require that you have a tall glass of milk to drink with them. They have a crackly, shiny, slightly crispy top and a rich, fudgy interior. Each deeply chocolaty bite is further intensified by the generous amount of chocolate chips in the batter. The simultaneously rich and melt in your mouth light texture of these cookies is created by beating the eggs, vanilla and sugar until it becomes light and thick before adding in the rest of the ingredients.

This recipe istaken from Martha Stewart's website here and is one of the few recipes that I didn't adapt heavily. The only changes I made were to use whole wheat flour instead of all purpose (which actually worked marvelously) and decrease the amount of chocolate chips since 12 oz seemed a little extreme to me. Also, it is VERY important not to over bake these cookies, when you first pull them out, the middle will seem almost batter-y, this is fine, they'll bake a bit longer on the pan as they cool.


Martha Stewart's Outrageous Chocolate Cookies
Makes 2 1/2 dozen

8 ounces semisweet chocolate, roughly chopped
4 tablespoons unsalted butter
2/3 cup all-purpose flour, spooned and leveled (I used Whole Wheat)
1/2 teaspoon baking powder
1/2 teaspoon salt
2 large eggs
3/4 cup packed light-brown sugar
1 teaspoon vanilla extract
1 package (12 ounces) semisweet chocolate chunks (I used one heaping cup)

Preheat oven to 350 degrees. Heat chopped chocolate and butter in a microwave-safe bowl in 20-second increments, stirring in between, until almost melted; do not overheat. In another bowl, whisk together flour, baking powder, and salt.
In a mixing bowl, beat eggs, brown sugar, and vanilla on high speed until light and fluffy. Reduce speed to low; beat in melted chocolate. Mix in flour mixture until just combined. Stir in chocolate chunks.
Drop heaping tablespoons of dough 2 to 3 inches apart onto baking sheets. Bake, rotating sheets halfway through, until cookies are shiny and crackly yet soft in centers, 12 to 15 minutes. Cool on sheets 10 minutes; with a thin metal spatula, transfer to racks to cool completely.

Tomorrow

My new computer (finally) comes tomorrow.  Trust me, I have recipes for you.  Chewy molasses gingersnaps that stay soft for days (I know, I've been virtuously eating them slowly so they've been sitting in a box for the past few days).  Balsamic maple Quinoa stuffed squash. yep, I have recipes, just no means of uploading pictures....until tomorrow that is.  Send me good vibes so that the UPS truck doesn't suddenly explode or get hijacked leaving e computer less for even longer.  Sorry for the absence but I'll be back soon.
 

Copyright © 2009 The Quirky Kitchen All rights reserved.
Converted To Blogger Template by Anshul Theme By- WooThemes