
Of Deceased Computers
My computer is dead. Completely and utterly dead (I'm currently writing on a borrowed computer). On the bright side, I now have a shiny new computer that should be arriving in the mail next Tuesday. The down side is, until then, I can't exactly post recipes and pictures. I will be taking many, many pictures for thanksgiving however so, to anyone following my blog, check back next Tuesday.
To anyone who happens upon this blog
I just wanted to put it out there to anyone who happens to look at this blog, sometimes I need help. This is a very new blog. This blog hasn't even begun to crawl, let lone walk. That said, I would vastly appreciate any suggestions from anyone who happens to look at my blog as to how it can be improved. Don't like the color scheme...let me know. Know of some way I could make my pictures look tastier...inform me. Is there some feature that other blogs have which mine is severely lacking...tell me about it. Seriously, any suggestions are more than welcome. This is my very first foray into the blogging world, help me make it more successful and fun. Thank you
Melody
Melody
The Oatmeal Cookie Perfected

I have always loved oatmeal cookies. I would even go so far as to say that it is my absolute favorite dessert. Sure I love to create decadent, complicated confections, and I will never say no to a slice of pie or a wedge of cheesecake, but when it comes down to it, nothing quite beats the homey, comforting feeling of a warm oatmeal cookie fresh out of the oven. Crispy on the edges soft (ok, basically dough-like if you're me) in the middle and just enough chocolate chips or raisins scattered throughout to give it texture and flavor but not overwhelm the cookie. That to me is sweet treat perfection.
That said, a good, reasonably healthy, low fat cookie of any sort is very hard to come by. Most (Oh, and I have tried many many times) end up in one of three categories. Hard little rocks that taste nice but do not satisfy cookie cravings, cake like cookies that are essentially muffins baked without a muffin pan (good but not a cookie), and finally piles of smush, sometimes tasty and always dissappointing. And so, for the past few months I have been working on creating the perfect, low fat, reasonably healthy oatmeal cookie. Let's just say that there have been many failures, some inedible, most just dissappointing. It got to the point where I had essentially given up, and then the malted barley cookies were created. These cookies were good. They had an almost buttery taste to them without butter. They were chewey in the inside and crispy on the outside. Good, but not an oatmeal cookie. It was a statring point. I learned that malt could make a cookie interesting, could make it buttery without butter or margerine (ug) and so I experimented more. I bought liquid malt extract from a local brewing store and tweaked with ingredient ammounts until I finally came up with the perfect cookie. This cookie looks, tastes, and acts like any normal, buttery oatmeal cookie. It spreads on the pan instead of simply puffing up, it's chewey in the middle and crispy on the edges. It is delicious, sweet and just a little bit salty. Practically perfect and utterly delicious.

The Perfect Low Fat Oatmeal Cookie
1 cup whole wheat flour
1 tsp baking powder
1/2 tsp baking soda
1/2 tsp salt
1 tsp cinnamon (optional, I only include it if I'm making oatmeal raisin cookies)
1 tbsp canola oil (or other neutral flavored oil)
3/4 cup natural sugar (or simply do 3/4 cup light brown sugar)
1 tbsp molasses
1 large egg
2 tsp liquid malt extract (could possibly substitute barley malt syrup, I'm not sure)
1 large egg
1/4 cup applesauce
1 tsp vanilla extract
1 tbsp milk
1 1/4 cups oats
Chocolate chips or raisins to taste (I personally prefer cookies that are mostly cookie with just a few chocolate chips thrown in, but I know I'm weird)
Preheat the oven to 350 F and line a bakingsheet with parchment paper. In a medium bowl mix together flour, baking powder, baking soda, salt and cinnamon (if using) and set aside. In another bowl combine together sugar, molasses and canola oil until fully mixed. Beat in egg, malt extract, vanilla, milk, and applesauce. Pour the dry mixture into the wet mixture and stir until fully combined. Fold in the oats and the chocolate chips or raisins. Drop by the tablespoonful onto a baking sheet and flatten slightly with your fingers or the back of a spoon. Bake about 10 to 15 minutes but check continuously after 10 (mine were done in 12). Let cool on the pan for a few minutes and then transfer to a wire rack to cool completely. Store in an airtight container
Makes 2 dozen (I always get 25 out of it which really bothers my obsessive-compulsive side).
Banana Bread Oatmeal

It seems I am a rare specimen these days. The last of a dying breed. I am a breakfast eater. That's right, I take the time every morning to prepare and enjoy a healthy, hearty, warm breakfast, even if that means getting up at a ridiculously early hour.
Now that's not to say that I put a whole lot of time or effort into my breakfast most mornings. Oh no, most mornings I eat exactly the same thing and I am here to share it with you.
This year I made a new and wonderful food discovery. To preface this, I have never been a huge oatmeal fan. Too gloppy and goopy and (let's face it) snotty. Something consumed out of small instant packets on long backpacking trips and certainly not the way I usually want to start off my day. That was what I thought until I discovered steel cut oats. Oh the wonders! This was not the goobery oatmeal I was used to. Oh no, this was something much more. This had texture, and flavor. I immediately set about trying to find the perfect, healthy way to dress up my new discovery. After many a trial and error (not such a huge fan of plums and oatmeal, or dried cranberries for that matter) I finally hit upon the perfect combination and thus was born banana bread oatmeal. That's right, you get a perfectly healthy scrumptious breakfast AND you get to use up all those overripe bananas that you haven't gotten around to baking with (yes, I know they're on your counter). Anyway, here is my ridiculously simple, one serving bowl of banana bread oatmeal. Enjoy!

Banana Bread Oatmeal (Serves 1)
1/3 cup Steel Cut oats
1/2 cup water
1/2 cup soy milk or any other milk of your choice (alternately you could do just 1 cup water or 1 cup milk, this is just what works for me)
Splash of vanilla extract (optional, or you could try other extracts, coconut perhaps? almond?)
1 large overripe banana
1 tsp cinnamon
1/4 - 1/2 tsp freshly grated nutmeg
1-2 Tbsp toasted walnuts roughly chopped
Extra milk or soy milk for pouring over top
Put oats, water, soy milk, and vanilla in a pot over medium heat. Simmer 20 - 30 minutes. Place almonds in a preheated oven (to about 400) or a toaster oven and toast 5 to 10 minutes. While nuts toast and oatmeal cooks, go shower, put on makeup, pick out clothing, get ready. Once oatmeal is done cooking, break up overripe banana into a bowl and smash with the back of a fork into a pulp. Add cinnamon and nutmeg. Add in cooked oatmeal and stir well to combine. Top with toasted nuts and milk. Enjoy! :)
It goes without saying that this dish lends itself to an infinite number of variations. I've used walnuts instead of almonds, added different spices, mixed in raisins, and even went so far as to mix in pumpkin puree (don't ask, I was in a fall-ish mood, it was surprisingly decent though). Have fun with it!

Peter Reinhart's Spent Grain Bread

I have discovered a new love...yeast breads. Well, ok, maybe I'm still a bit nervous about yeast breads in general (I'm trying to get over it) but I have absolutely fallen in love with Peter Reinhart's spent grain bread. Spent grains, as I found out, are the grains left over from brewing beer.

When I first read about this bread I knew that I had to bake it. Maybe it was the name ("Spent Grain" just sounds so, well, rustic and homey) Maybe it was imagining the flavor of whole grains slightly sweetened with just a bit of honey. Whatever the case, I immediately set about figuring out how to get my hands on some spent grains. I debated calling up local breweries but I absolutely HATE calling people I don't know to ask for things, even businesses, and so I shelved the recipe in the back of my mind as something I would absolutely have to make...someday.
Flash foreward to this weekend. My boyfriend is perpetually coming up with new and usually complicated projects. He constructed a forge and began creating beautiful hooks and knives. He made himself a carving knife and took up whittling. He became a computer technician of sorts (a skill that I am often grateful for). Do you see where I'm headed?...No? Well, his most recent hobby was beermaking. An idea that I, imagining loaves and loaves of bread, enthusiastically encouraged him in.
And so, finally, this weekend I was able to bake my first batch of this amazing bread. The flavors were even better than I could have imagined. Slightly nutty whole wheat flour combined beautifully with the sweetness of honey and the earthy flavors of the grain (which also contributed wonderful crunch and texture).
By the end of the weekend I produced 4 loaves and 15 rolls. More bread than I have any idea what to do with, but I'm sure I'll find something...
By the way, you can find the recipe here. Be warned it makes a lot...and I made it twice! :)

Triple Chocolate Torte INSANITY
Let's see, where to begin... I currently live in a student co-operative housing unit (although that's going to be changing very soon) . One of the benefits to this housing situation (along with the copious amounts of food in the kitchen and the cheap rent) is that twice a year we hold an event called "Special Brunch." This is when the cooks of the house go all out and concoct fabulous dishes with ingredients we cannot afford to buy for every day cooking. The cooks are expected to prepare enough of their recipe to feed approximately 200 people and are given 2 or 3 days to do so. This year things were structured a little differently in that, at the end of the brunch, the crowed voted for their favorite main course, side dish and dessert and the chosen cooks were awarded $50 apiece. I decided to make a dessert and so I set about making a triple chocolate torte from this recipe by the Domestic Goddess decorated with mini chocolate pumpkins which can be found here. Over two days I worked 12 hours (not including refrigeration time) to construct two massive tortes. The cakes and pumpkins used 108 eggs, 25 lbs of chocolate and more butter and cream than I care to think of. There was much success and quite a few near disasters. One of the cakes did not want to come out of the pan which resulted in me flipping it upside-down and pounding on the bottom with a hammer until I heard a satisfying "plop" as my creation finally released its grip on the metal. The 48 egg whites took about an hour to from stiff peaks and then had to be whipped again when I miscalculated just how long it takes to melt 19 cups of chocolate. All in all however the experience was hectic but absolutely wonderful, and what do you know, I ended up winning the dessert category. :) Anyway, here are pictures of my absolute cake insanity.

The truth to the cake, here is what lies beneath that inocent layer of chocolate ganache...not a pretty sight but wonderfully delicious. A brownie base topped with chocolate mousse.

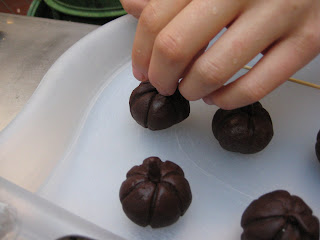
The creation of the mini chocolate pumpkin decorations
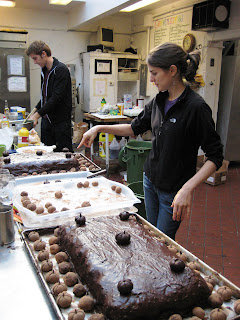
 More mini chocolate pumpkins
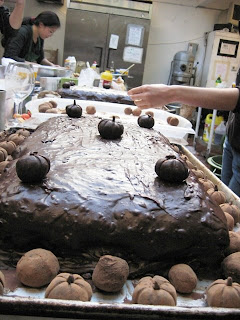
The finished cake, isn't it lovely?

The truth to the cake, here is what lies beneath that inocent layer of chocolate ganache...not a pretty sight but wonderfully delicious. A brownie base topped with chocolate mousse.

Ahh...much better, the cake looks a little prettier slathered with a layer of chocolate ganache
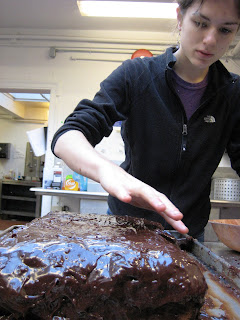 An here I am applying said ganache
 An here I am applying said ganache
The creation of the mini chocolate pumpkin decorations
 More mini chocolate pumpkins
The finished cake, isn't it lovely?

And one more look at that finished cake, (you can see the second one off in the background)
Bizarre but delicious cookies and the first rain of the year
Today it rained in Berkeley for the first time this year. Needless to say, I grabbed my rain boots and went puddle-stomping. By the time I got back home I was utterly drenched and perfectly happy. The only thing to do was bake cookies.
I currently live in a cooperative student housing unit and so downstairs I have, essentially, a mini grocery store. One day, while browsing about, I discovered a massive tub of malted barley. Now I had never heard of malted barley before and immediately wondered how I could use this strange new ingredient. Since the word malt reminded me of malted milkshakes and barley sort of looks like oats, I decided to try and make malted barley cookies. To my utter surprise and delight, the cookies were good, not only were they good, they were absolutely marvelous. They were so good, in fact, that I have now made them on three separate occasions and they have become my new all time favorite cookie. So as not to talk them up too much however, I must warn you that they do have a bit of an odd texture. They are much grainier than oatmeal cookies and have a bit of a crunch to them. Also, unlike most other low fat cookies, they keep well sealed in a tub at room temperature and do not turn to mush. And now, without further ado... (oh yeah, I found my camera!! :) so now there will be pictures)

Malted Barley Cookies
1 cup whole wheat flour (or all purpose if you prefer)
1 tsp baking powder
1/2 tsp baking soda
1/2 tsp salt
1 Tbsp canola oil (or any other neutral flavored oil)
3/4 cup raw sugar (or use brown sugar and leave out the molasses)
1 Tbsp molasses
1 large egg
1/4 cup unsweetened applesauce
1 tsp vanilla
1 heaping cup malted barley (probably more like 1 1/4 cup)
1/3 cup chocolate chips (I'm weird and like my cookies to have much more dough than chocolate so feel free to put more if you wish)
Preheat the oven to 350F and line a baking sheet with parchment paper. Combine the flour, baking powder, baking soda, and salt and set aside. In a separate bowl, combine the oil, molasses, and sugar and mix until fully combined. Beat in the egg followed by the vanilla and applesauce. Mix the flour mixture and barley into the wet ingredients until fully incorporated. Stir in the chocolate chips. Drop tablespoonfuls of the dough onto the prepared baking sheet and flatten slightly with the back of a spoon or your fingers. Bake for approximately 10 minutes or until brown around the edges. Store in a sealed container or devour in large quantities hot out of the oven.
